Add Angular component in your EPiServer site
Angular is a platform and framework for building client applications in HTML and TypeScript. Angular is written in TypeScript. It implements core and optional functionality as a set of TypeScript libraries that you import into your apps. It is easy to add Angular Components in our EpiServer MVC website with the following steps.
Installations
Prerequisite: Install the latest version of Node JS before proceeding.
Install Angular CLI - ( npm install -g @angular/cli ) The Angular CLI is a command-line interface tool that you use to initialize, develop, scaffold, and maintain Angular applications. You can use the tool directly in a command shell, or indirectly through an interactive UI such as Angular Console.
Create New Angular Component
Once prerequisites are installed, open the node js command prompt and browse to your alloy/quicksilver/EPiServer site root location. Create a new Angular application by running this command ng new firstEPiApp –minimal , Following below options will be asked, my preferences were as following
This will create a folder with name firstEPiApp under your project. To ensure every thing is setup correctly you can navigate to firstEPiApp and build the app, using command ng build, You should see this kind of output.
Move Folders and Files
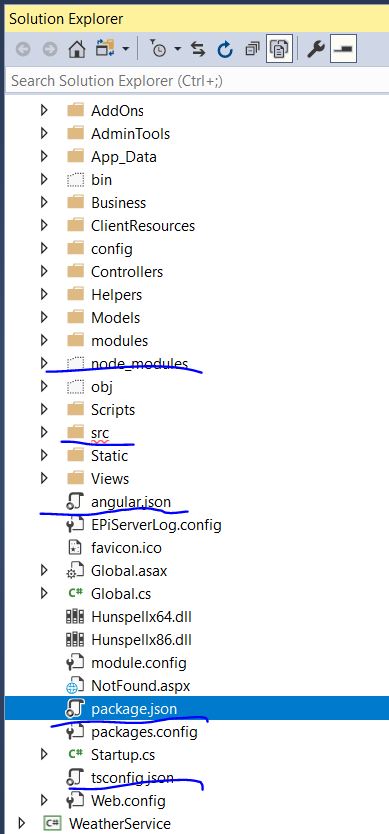
New Angular App is created under a folder firstEPiApp. We will require to move a few folders and files as shown below, back into the root folder of projects to work further.
Src folder - Contains all source files requires to build component.
package.json - Contains the list of npm packages needed to develop the component.
angular.json - Contains the configuration settings for the Angular component. Angular-CLI requires this file to work smoothly.
tsconfig.json - Configuration file to compile TypeScript files into JavaScript.
node_modules - Contains all of the downloaded node modules.
After copying the file we can include in our project.

Adjust Configurations
As we have altered the location the way Angular CLI generates App, we will need to adjust a few configuration settings in tsconfig.json and angular.json
angular.json,
provides workspace-wide and project-specific configuration defaults for build and development tools provided by the Angular CLI. Path values given in the configuration are relative to the root workspace folder. We will need to adjust outputPath as required, the new path is scripts/libs, I created libs folder manually.
tsconfig.json,
The presence of a tsconfig.json file in a directory indicates that the directory is the root of a TypeScript project. The tsconfig.json file specifies the root files and the compiler options required to compile the project. We will need to include config entry and set the src folder and adjust outDir.
Use in your View
After this adjustment at the command prompt run ng Build command again to make sure we haven't broken anything. Now we are ready to use this component in our project
In _Root.cshtml I added following section @RenderSection("scripts", required: false)
before the close of the body tag, to add angular scripts in razor views
As I am loading my Angular component on startup page, therefore I added following below code in StartPage/Index.cshtml
@section Scripts {
    <script type="text/javascript" src="~/Scripts/libs/runtime.js"></script>
    <script type="text/javascript" src="~/Scripts/libs/polyfills.js"></script>
    <script type="text/javascript" src="~/Scripts/libs/styles.js"></script>
    <script type="text/javascript" src="~/Scripts/libs/vendor.js"></script>
    <script type="text/javascript" src="~/Scripts/libs/main.js"></script>
}

<app-root></app-root>
and that's all


Comments
Post a Comment